Ever wished you could bring the movie theater experience right into your living room? Imagine snuggling on the couch with a giant screen, watching your favorite films! The good news is, you can! Building your own DIY projector screen is easier than you think, and it’s a fantastic way to enjoy big-screen entertainment without spending a fortune.
But, let’s be honest: choosing a projector screen can be tricky. Store-bought screens are often expensive, and the options can be confusing. You might wonder about the best materials, sizes, and even how to hang the screen. Don’t worry! This guide will help you skip the expensive options and make your own perfect screen. We’ll walk you through everything, making the process simple and fun.
By reading this post, you’ll learn how to build a fantastic DIY projector screen. You’ll discover the best materials to use, easy step-by-step instructions, and tips for a professional-looking finish. You’ll also learn how to avoid common mistakes. Get ready to impress your friends and family with your awesome new home theater! Let’s get started and build that awesome screen!
Our Top 5 Diy Projector Screen Recommendations at a Glance
Top 5 Diy Projector Screen Detailed Reviews
1. Projector Screen DIY Elastic Polyester Material 59×105 inch for Max 130 inch 16:9 Projection Screen Economical Black Backing 4K Ultra HD Front Projection Textile Fabric

Rating: 8.6/10
Want a bigger, better movie night? This DIY projector screen is a budget-friendly way to upgrade your home theater. The elastic polyester material is easy to use. You can build a screen up to 130 inches! It is made for front projection, so you can place your projector in front of the screen. The screen has a light silver-gray color. It helps with color contrast and cuts down on unwanted light. It also has a black backing. This helps the picture look even better.
What We Like:
- Easy DIY setup. You can build your own screen.
- Economical price. It is a cheap way to get a big screen.
- Good picture quality. The light silver-gray color and black backing help the picture.
- Wide viewing angle. You can watch from many different spots in the room.
- Sound-friendly. The material lets sound pass through.
What Could Be Improved:
- Not for rear projection. You can only use it with front projectors.
- May have creases. The material ships folded, but they will disappear. You can also iron it.
This DIY screen is a great choice for anyone who wants a large screen without spending a lot of money. It is easy to set up, and the picture quality is good. Get ready to enjoy your favorite movies!
2. ALR Projector Screen Material for Standard Throw- for DIY Frame or Wall Mounted – High Contrast 70% ALR High Brightness 2.7X Gain – 160 inch 2.35:1 Gray Screen – – by SilverMagic

Rating: 9.0/10
The SilverMagic ALR Projector Screen Material is designed to make your movies look great. It’s perfect for standard throw projectors. This screen helps block out extra light. This means your picture will look brighter, even with lights on. You can mount it on a wall or build your own frame. The screen offers a 160-inch, 2.35:1 gray screen with high brightness.
What We Like:
- The screen blocks out 70% of ambient light. This improves image contrast.
- The screen makes the image brighter from the center seats. It has a gain of up to 2.7X.
- Images look sharper and more vivid. It gets rid of light bleed.
- The screen is flat. It looks like a fixed-frame screen. It doesn’t have wrinkles.
- It is easy to install. You can install it in about 10 minutes.
What Could Be Improved:
- The screen may be darker for seats further away from the center.
- This screen is not for UST (Ultra Short Throw) projectors.
This SilverMagic screen is a good choice for home theaters. It is a great way to make your movies look better.
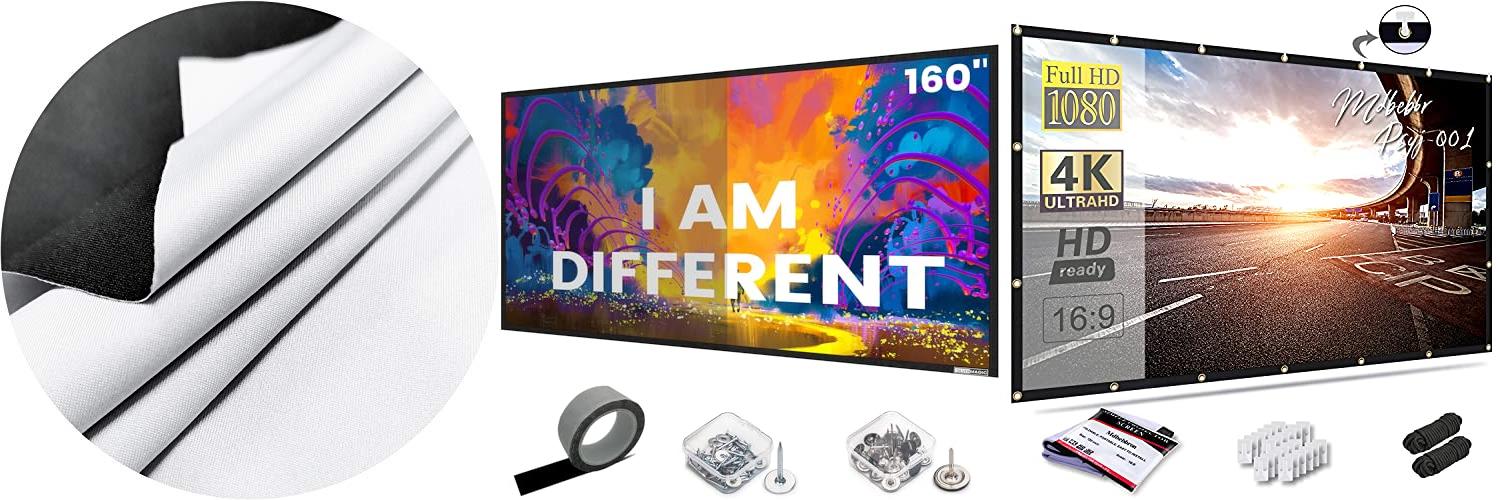
3. Mdbebbron 120 inch Projector Screen 16:9 Foldable Anti-Crease Portable Projector Movies Screens for Home Theater Outdoor Indoor Support Double Sided Projection

Rating: 9.4/10
The Mdbebbron 120 inch Projector Screen is a portable screen. It is designed for home theaters, outdoor movies, and presentations. This screen is foldable and easy to take with you. It supports double-sided projection and is made to prevent wrinkles. It offers a large viewing area for your movies and presentations.
What We Like:
- It is easy to store and carry. You can fold it up and put it in a bag.
- This screen works well in many places. Use it at home, the office, or outside.
- The material helps make the picture clear. The screen is smooth and doesn’t wrinkle easily.
- Setting it up is simple. You can use hooks, ropes, or tape to hang it up.
- It has a 16:9 format. This gives you a big 120-inch screen for viewing.
What Could Be Improved:
- The material may not be as durable as some other screens.
- The included mounting hardware might be basic.
The Mdbebbron 120 inch Projector Screen is a good choice for anyone needing a portable screen. It’s a great value for the price and works well for many different uses.
4. Projector Screen Material Ambient Light Rejecting Fabric 69×118 inch for Max 130 inch 16:9 Screen DIY

Rating: 9.0/10
This DIY projector screen material is designed to improve your home theater experience. The Projector Screen Material Ambient Light Rejecting Fabric (69×118 inch) is perfect for building your own 130-inch 16:9 screen. It uses a special grey EVA polymer material that helps reject ambient light. This means you can enjoy clear pictures even when the room isn’t completely dark. The fabric is designed for front projection and offers high contrast and color saturation for a great viewing experience. Remember, this is just the material; you’ll need to build a frame for it.
What We Like:
- The material is environmentally friendly and meets safety standards.
- It provides a wide viewing angle (over 160 degrees) so everyone can see the screen.
- The fabric provides good light resistance.
- It offers high contrast and color saturation.
- The black backing prevents light from coming through and ruining the picture.
What Could Be Improved:
- It’s only for DIY projects, so you must build the screen yourself.
- It’s not suitable for all projector types (recommend projector with 2000ANSI or above).
- It’s not for rear or short throw projection.
- You can’t hang it directly; it needs a fixed frame.
This projector screen material is a good choice for those who want a high-quality, DIY screen. If you’re looking for a good picture even with some light in the room, this might be the right option for you.
5. Yescom 177″ 16:9 DIY Projection Screen Material Matte White PVC Projector Screen Coated 154″x86″ Indoor Outdoor Home Theater Conference Room

Rating: 8.5/10
The Yescom 177″ 16:9 DIY Projection Screen Material is a large, affordable option for home theater enthusiasts. This screen lets you build your own projector screen. It is great for indoor and outdoor use. It’s perfect for movies, games, and presentations. This screen offers a big viewing area and simple setup.
What We Like:
- Large size for a great viewing experience.
- Matte white surface gives clear images.
- Made from durable PVC coated material.
- You can cut and customize the screen to fit your needs.
- Easy to roll up and store when not in use.
- Works well for home theaters, offices, and outdoor events.
What Could Be Improved:
- The screen material is not pre-framed. You must build your own frame.
Overall, the Yescom DIY projection screen is a good value. It is a great way to create a large-screen viewing experience without spending a lot of money.
Build Your Own Big Screen: A DIY Projector Screen Guide
Are you ready for movie nights, gaming sessions, or presentations on a giant screen? Building your own DIY projector screen is a fun and budget-friendly project. This guide will help you create a fantastic viewing experience.
Key Features to Look For
When planning your DIY projector screen, you need to think about a few things. These features will help you enjoy your new screen.
- Screen Size: Decide how big you want your screen. Measure your wall or space carefully. Think about how far you will sit from the screen.
- Aspect Ratio: This is the shape of the screen. The most common is 16:9, which is great for movies and TV shows. Other options exist, too.
- Screen Material: This is the surface that will show the picture. Different materials offer different picture quality.
- Frame or Frameless: Do you want a frame around your screen, or do you want it to be edge-to-edge? A frame can make the screen look cleaner.
- Portability: Do you want to move the screen? Consider a roll-up screen or a screen that folds.
Important Materials
The materials you choose will affect the final look and feel of your screen.
- Screen Material:
- Paint: Special projector screen paint is available. It is easy to use.
- Fabric: White or gray fabric works well. Look for fabric that is smooth and reflects light.
- Vinyl: Vinyl is a durable option. It’s easy to clean.
- Frame Materials:
- Wood: Wood is a common choice for frames. It’s easy to work with.
- PVC Pipes: PVC pipes are a lightweight and affordable option.
- Metal: Metal frames are strong and durable.
- Tools:
- Measuring tape
- Scissors or a utility knife
- Staple gun (if using fabric)
- Paint roller and brush (if using paint)
- Screws, nails, or adhesive (for assembly)
Factors That Improve or Reduce Quality
Your choices can make your screen look great or not so great.
- Surface Smoothness: A smooth surface is important. It will show a clear picture. Wrinkles or bumps will mess up the image.
- Material Quality: High-quality materials will give you a better picture. They will also last longer.
- Ambient Light: How bright is the room? A darker room will give you the best picture quality. You can get special materials to fight the light.
- Projector Placement: The projector should be placed properly. This will give you the best image on the screen.
- Assembly: The frame should be sturdy. The screen material should be stretched tightly.
User Experience and Use Cases
Building a DIY projector screen is a rewarding experience. Here are some ideas:
- Home Theater: Enjoy movies at home with a large screen.
- Gaming: Play video games on a giant screen.
- Outdoor Movie Nights: Set up a screen in your backyard for fun.
- Presentations: Use a screen for work or school presentations.
- Budget-Friendly Entertainment: Save money by building your own screen.
DIY Projector Screen FAQs
Here are some common questions about DIY projector screens.
Q: What is the best material for a DIY projector screen?
A: It depends on your needs! Paint is easy to use. Fabric is a good option. Vinyl is durable and easy to clean. Consider your budget and how you will use the screen.
Q: How do I calculate the screen size?
A: Measure your wall. Think about how far you will sit from the screen. Use online calculators to help you.
Q: Can I use regular white paint?
A: You can use regular white paint, but it might not give you the best picture quality. Special projector screen paint is better.
Q: How do I build a frame for the screen?
A: You can use wood, PVC pipes, or metal. Cut the materials to the correct size. Then, assemble the frame using screws, nails, or adhesive.
Q: How do I attach the screen material to the frame?
A: If you use fabric, you can stretch it tightly and staple it to the frame. If you use paint, apply it evenly to the frame.
Q: How do I clean a DIY projector screen?
A: Clean the screen gently. Use a soft cloth and mild soap. Avoid harsh chemicals.
Q: What aspect ratio should I choose?
A: The most common aspect ratio is 16:9. This is great for movies and TV shows. Other options include 4:3 and 2.35:1.
Q: Is it hard to build a DIY projector screen?
A: It can be easy! The difficulty depends on the design. Start with a simple project if you are a beginner.
Q: Can I make a portable DIY projector screen?
A: Yes! You can build a roll-up screen or a screen that folds. This will make it easy to move the screen.
Q: Is a DIY projector screen better than buying one?
A: It depends! DIY screens can be cheaper. You can also customize your screen. Commercial screens might have better quality. Think about your budget and needs.
In conclusion, every product has unique features and benefits. We hope this review helps you decide if it meets your needs. An informed choice ensures the best experience.
If you have any questions or feedback, please share them in the comments. Your input helps everyone. Thank you for reading.
Hi, I’m Florence Disha, the creator behind HomesMend.com. With a passion for making every house a home, I share my personal experiences, tips, and expertise to help you transform your living spaces. Whether it’s practical advice, creative ideas, or tried-and-true solutions, my goal is to inspire and guide you in creating a home that feels just right. Let’s make every corner of your space truly yours!